Lessons > Tutorial 1. Installation & Configuration
Assumptions: This tutorial assumes that you have reviewed the materials and videos assigned in lesson 2.
1. Install Atom
Download and install Atom: https://atom.io/. Note: if you installed it on a Mac, you will need to drag the Atom Icon (green ball) into your Applications folder.
2. Organize your files
File management and organization are an essential part of programming and web development. As such, we suggest the following system:
- Create a course folder called cs130 somewhere on your computer. Many people store theirs in Documents or on their Desktop.
- Create a tutorials folder inside of your cs130 folder.
- Download the tutorial01.zip file, unzip it (ask your TA if you’re new to zipping / unzipping files) and put them into the cs130/tutorials folder.
cs130
    |-- tutorials
    │   |-- tutorial01
    │   |-- tutorial02
    |   ...
    |
    |-- homework
    │   |-- hw01
    │   |-- hw02
    |   ...
    |
    |-- lessons
        |-- lesson_01
        |-- lesson_02
        ...
3. Take a look at your files
You will be editing your files using Atom (or another code editor of your choice), and viewing your resulting files in your web browser.
View file in Atom
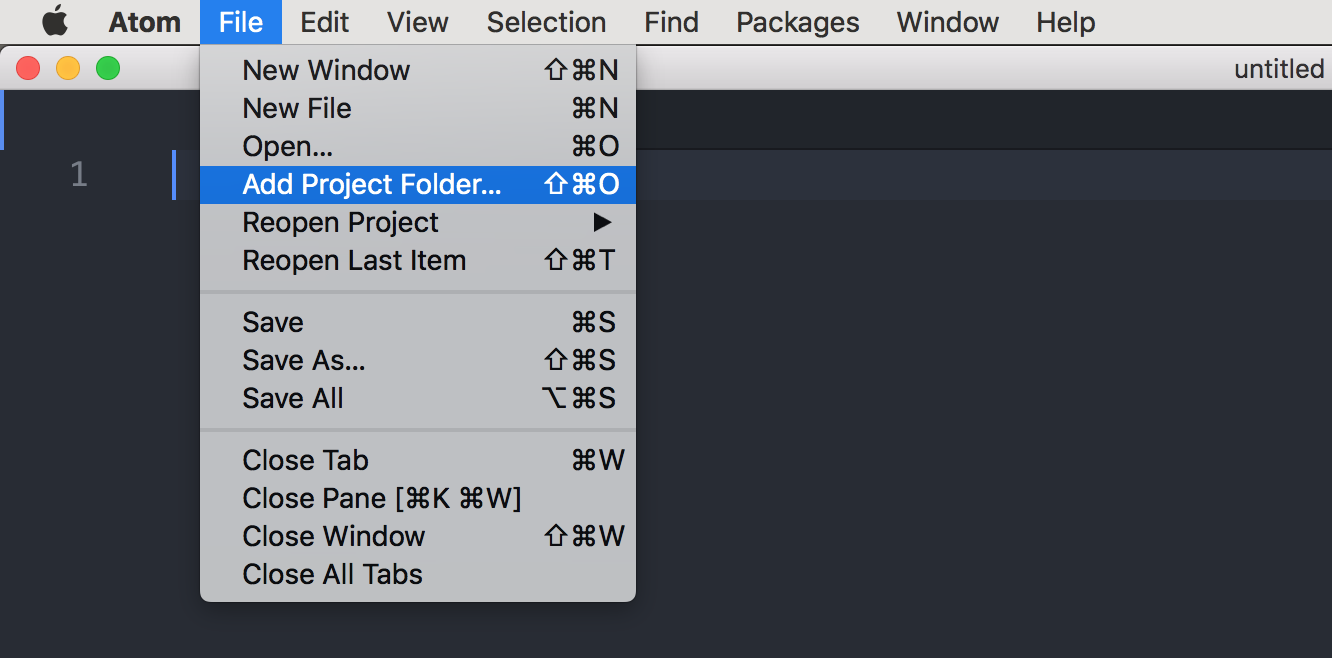
- Open Atom (your code editor).
- Add your entire cs130 folder to Atom by clicking File » Add Project Folder… and then navigate to wherever you saved your cs130 folder.
- Open your index.html file and take a look at it. You should see a very simple HTML file that looks like this:
<!DOCTYPE html>
<html lang="en">
   <head>
        <!-- stylesheets and metadata go here -->
       <title>Page 2</title>
       <link rel="stylesheet" href="style.css">
   </head>
   <body>
       <!-- HTML content tags go here -->
       <h1>Page Title</h1>
       <p>Hello world!</p>
   </body>
</html>
View file in Web Browser
Once you’ve taken a look at the code in Atom, go to your file navigator (Windows Explorer for Windows, Finder for Mac), and double-click index.html to preview it in your browser. For this course, we recommend that you use Chrome because it has some really great built-in developer and debugging tools.
4. Complete the Exercise
Now that you’re set up, your tutorial task for this week involves editing the index.html file to create a themed media gallery. Pick a theme, for example: “dogs,” “nature,” “food”, “art”, “life during COVID-19,” etc. If you’re not feeling creative, then make a media gallery to showcase things you like about the place you’re currently living.
You are encouraged to use the HTML Reference on the course website.
Please make the following changes to your index.html:
1. Title
In Atom: Change the title and header (h1 tag) of index.html to correspond with the theme you have chosen. Save it and then preview your changes in your web browser.
2. Navigation
Above the header (but still within the body tag), create a navigation section in your index.html file that has links to two other pages (you will be coming back to this). Suggestion: use a div tag as the container, and put links inside of it.
3. Paragraph
Create a paragraph tag below the heading and edit the text to introduce your page (can be very short); can be copied from somewhere else.
4. Images
Add some image tags (src attribute) linking to images that relate to your theme (add at least three):
- Some of the images should be relative. To make this happen, you need to download some images from the web and save them inside of your tutorial01 folder. The, create an image tage with a relative link to your image.
- Some images should be absolute (linked directly to the webpage you found them on). Refer to the images page on the course website.
Hint: Please see the course resources on images and absolute and relative links.
5. IFrame
Embed an iframe of a video on your topic next to your image gallery.
Hint: Please see the course resources on media tags.
6. Create a new HTML file
Create a brand new HTML file called page_2.html with the following skeleton:
<!DOCTYPE html>
<html lang="en">
   <head>
       <title>Page 2</title>
       <link rel="stylesheet" href="style.css">
   </head>
   <body>
       <!-- You HTML code goes here -->
   </body>
</html>
- Copy your navigation and heading from the first page into your new page_2.html page.
- Create a heading for your new page.
- Create an ordered list list that describes a few things you might want to know about the topic.
- Below your list, create a table that shares some important information about your topic: statistics, facts, etc. Even if you’re using a reference, please do try to type the table syntax yourself (so that you can get some practice looking at syntax more carefully, and developing good indenting practices.
Hint: Please see the course resources on lists & tables.
7. Update the Navigation
Modify the navigation section in each of your two pages so it is possible to link to the other page and to an external link with more information about your topic. For example: Navigation for index.html should look something like this…
Home | Page 1 | More information
…where each word is a link to the appropriate page.
Make sure that the Home and Page 1 links are relative links and that the “More Info” link is an absolute link to an external page. Moreover, if it’s an external link, make sure the page opens in a new tab (instead of the same tab) using the target attribute.
Hint: Please see the course resources on images and absolute and relative links.
5. Optional Enhancements
While we have not yet covered CSS or Web Accessibility ideas, we encourage you to look towards what’s coming next and start getting oriented with CSS and accessibility standards.
Accessibility enhancements
Note: following accessibility guidelines is good for everyone — people with disabilities, screen readers, and crawlers and machines who are indexing your content so that you are discoverable on the web. Some simple things you can do:
- Alt tags for images [source]
- Add captions and summaries to table [source]
- Validate your HTML using an online validator
CSS enhancements
Try editing style.css as follows:
- See if you can change the fonts and/or text color of the h1 tag
- Try resizing the images
- See if you can get your iframe to have the same style as your image
- Change the background color of you web page
- See if you can get your hyperlinks to have a hover effect
6. What to turn in
Please zip your entire tutorial01 folder (ask your TA if you don’t know how to do this), and submit it to Canvas under Tutorial 1.